Select the access method before replacing a ceiling lamp, driver or ballast. A heavy fitting, sustained two-handed work or sideways force can require a platform even when the ceiling is low.
Stepladder lighting maintenance
This is reference content written and revised with AI. It has not been verified or approved by a professional. Review by a suitably qualified professional and site authorisation are required before use.
Stop work
Stop if a critical control is missing, the conditions change, an unplanned movement occurs, or an exclusion boundary is breached. Secure the area. The responsible competent person must resolve the cause, document the evidence and obtain site authorisation before restart.
1. Legal and technical scope
| Basis | Application limits |
|---|---|
| HSE — Safe use of ladders and stepladders | HSE guidance for Great Britain: stable footing, locking, suitable handholds and control of side loading. Confirm Northern Ireland requirements separately. |
| HSE — Work at height FAQs | Brief light two-handed stepladder work is conditional on suitable body support; it does not justify prolonged ballast replacement. |
| OSHA 29 CFR 1910.333 | Foreign US technical reference for isolation, not UK electrical legislation. |
HSE guidance for Great Britain: stable footing, locking, suitable handholds and control of side loading. Confirm Northern Ireland requirements separately. Brief light two-handed stepladder work is conditional on suitable body support; it does not justify prolonged ballast replacement. Foreign US technical reference for isolation, not UK electrical legislation.
HSE advises against working from the top three steps without a suitable handhold. Brief light two-handed work needs suitable body support and risk assessment; sustained fitting replacement may need a platform. Do not transfer a leaning-ladder angle to an A-frame or treat a helper as a substitute for stable footing.
2. Scope and required inputs
Included scope
Planning, preparation, execution, controlled shutdown and handover are covered by the eight stages below. Each stage requires site-specific inputs and competent review.
Separate review
Live electrical work, improvised ladder configurations and tasks beyond the selected access equipment are excluded.
| Required input | What to verify |
|---|---|
| Select access | Access choice · Task duration · Fitting weight · Standing-level label |
| Inspect and set | Ladder ID · Feet and locks · Support condition · Barrier layout |
| Isolate supply | Isolation register · Tester before/after · All conductors tested · Qualified electrician |
| Climb and transfer | Climbing route · Tool bag check · Load transfer plan · Clear landing |
| Replace fitting | Standing position · Stable working posture · Fitting support · Isolation remains valid |
| Check before power | Connection inspection · Product compatibility · Covers secured · Area clear confirmation |
| Restore and test | Lock removal record · Function test result · Fault disposition · Release authority |
| Clear and hand over | Waste classification · Final area check · Equipment defect log · Handover record |
Public sources were checked on 12 October 2026. Paid standards, project calculations and the actual equipment manuals were not reviewed in full. This is not a compliance certificate. Confirm the applicable jurisdiction, current texts and model instructions before use.
Select head, eye, hand and foot protection for the actual hazards and compatibility. Respiratory, hearing, electrical and fall protection require task-specific selection and training; equipment must not create an additional hazard. PPE does not replace isolation, structural stability or exclusion.
3. Eight-stage JSA
| Job stage | Hazards and effects | Failure factors | Technical and procedural controls | Site verification | P | S | R | A |
|---|---|---|---|---|---|---|---|---|
| 1. Select access | 1. Fall from height2. Overreach3. Heavy fitting4. Long exposure | 1. Wrong ladder size2. Work needs two hands3. Forceful fixing4. Platform not considered | 1. Choose safer platform2. Limit light brief work3. Check reach and load4. Follow local ladder rules | 1. Access choice2. Task duration3. Fitting weight4. Standing-level label | ||||
| 2. Inspect and set | 1. Ladder collapse2. Foot slip3. Hinge pinch4. Impact from doors | 1. Worn feet2. Spreaders unlocked3. Uneven support4. Traffic crosses base | 1. Quarantine defects2. Open and lock fully3. Use firm level support4. Secure doors and zone | 1. Ladder ID2. Feet and locks3. Support condition4. Barrier layout | ||||
| 3. Isolate supply | 1. Electric shock2. Arc injury3. Unexpected restart4. Stored charge | 1. Wrong circuit2. Switch only off3. Battery still connected4. Untested conductor | 1. Identify all feeds2. Lock isolation points3. Discharge per procedure4. Prove dead with suitable tester | 1. Isolation register2. Tester before/after3. All conductors tested4. Qualified electrician | ||||
| 4. Climb and transfer | 1. Loss of grip2. Dropped lamp3. Missed step4. Side loading | 1. Hands carry tools2. Face away on descent3. Loose footwear4. Large load on handline | 1. Face ladder and grip2. Maintain three contacts3. Use secured tool bag4. Transfer loads safely | 1. Climbing route2. Tool bag check3. Load transfer plan4. Clear landing | ||||
| 5. Replace fitting | 1. Fall while reaching2. Sharp-edge cut3. Fitting drops4. Unexpected live part | 1. Stand on forbidden step2. Lean beyond rails3. Release unsupported lamp4. Scope changed | 1. Use permitted standing level2. Descend to reposition3. Support fitting before release4. Stop for changed scope | 1. Standing position2. Stable working posture3. Fitting support4. Isolation remains valid | ||||
| 6. Check before power | 1. Shock at open cover2. Loose electrical joint3. Falling loose parts4. Unexpected illumination | 1. Cover left open2. Wrong replacement3. Tools inside fitting4. People still exposed | 1. Electrician checks connections2. Secure all covers3. Count tools and parts4. Clear people before restoration | 1. Connection inspection2. Product compatibility3. Covers secured4. Area clear confirmation | ||||
| 7. Restore and test | 1. Unexpected energisation2. Electrical fault3. Fall during test4. Public entry | 1. Lock removed by others2. Fault ignored3. Live adjustment on ladder4. Barriers removed early | 1. Use authorised restoration2. Test from safe position3. Stop and reisolate faults4. Keep zone until safe | 1. Lock removal record2. Function test result3. Fault disposition4. Release authority | ||||
| 8. Clear and hand over | 1. Broken glass2. Mercury exposure3. Folding pinch4. Blocked escape route | 1. Mix lamp waste2. Sweep broken tube dry3. Hands in hinge4. Unsecured storage | 1. Use suitable waste container2. Apply lamp spill procedure3. Fold by designated grips4. Secure ladder and clear route | 1. Waste classification2. Final area check3. Equipment defect log4. Handover record |
PDF A covers basic task controls; B focuses on technical failures; C covers supervision, records and handover. The article has eight stages with four items per main cell; each PDF has six key stages with three items per main cell. P/S/R/A, measurements, confirmations and signatures remain blank for actual site assessment.
4. Fictional scenario and failure mechanisms
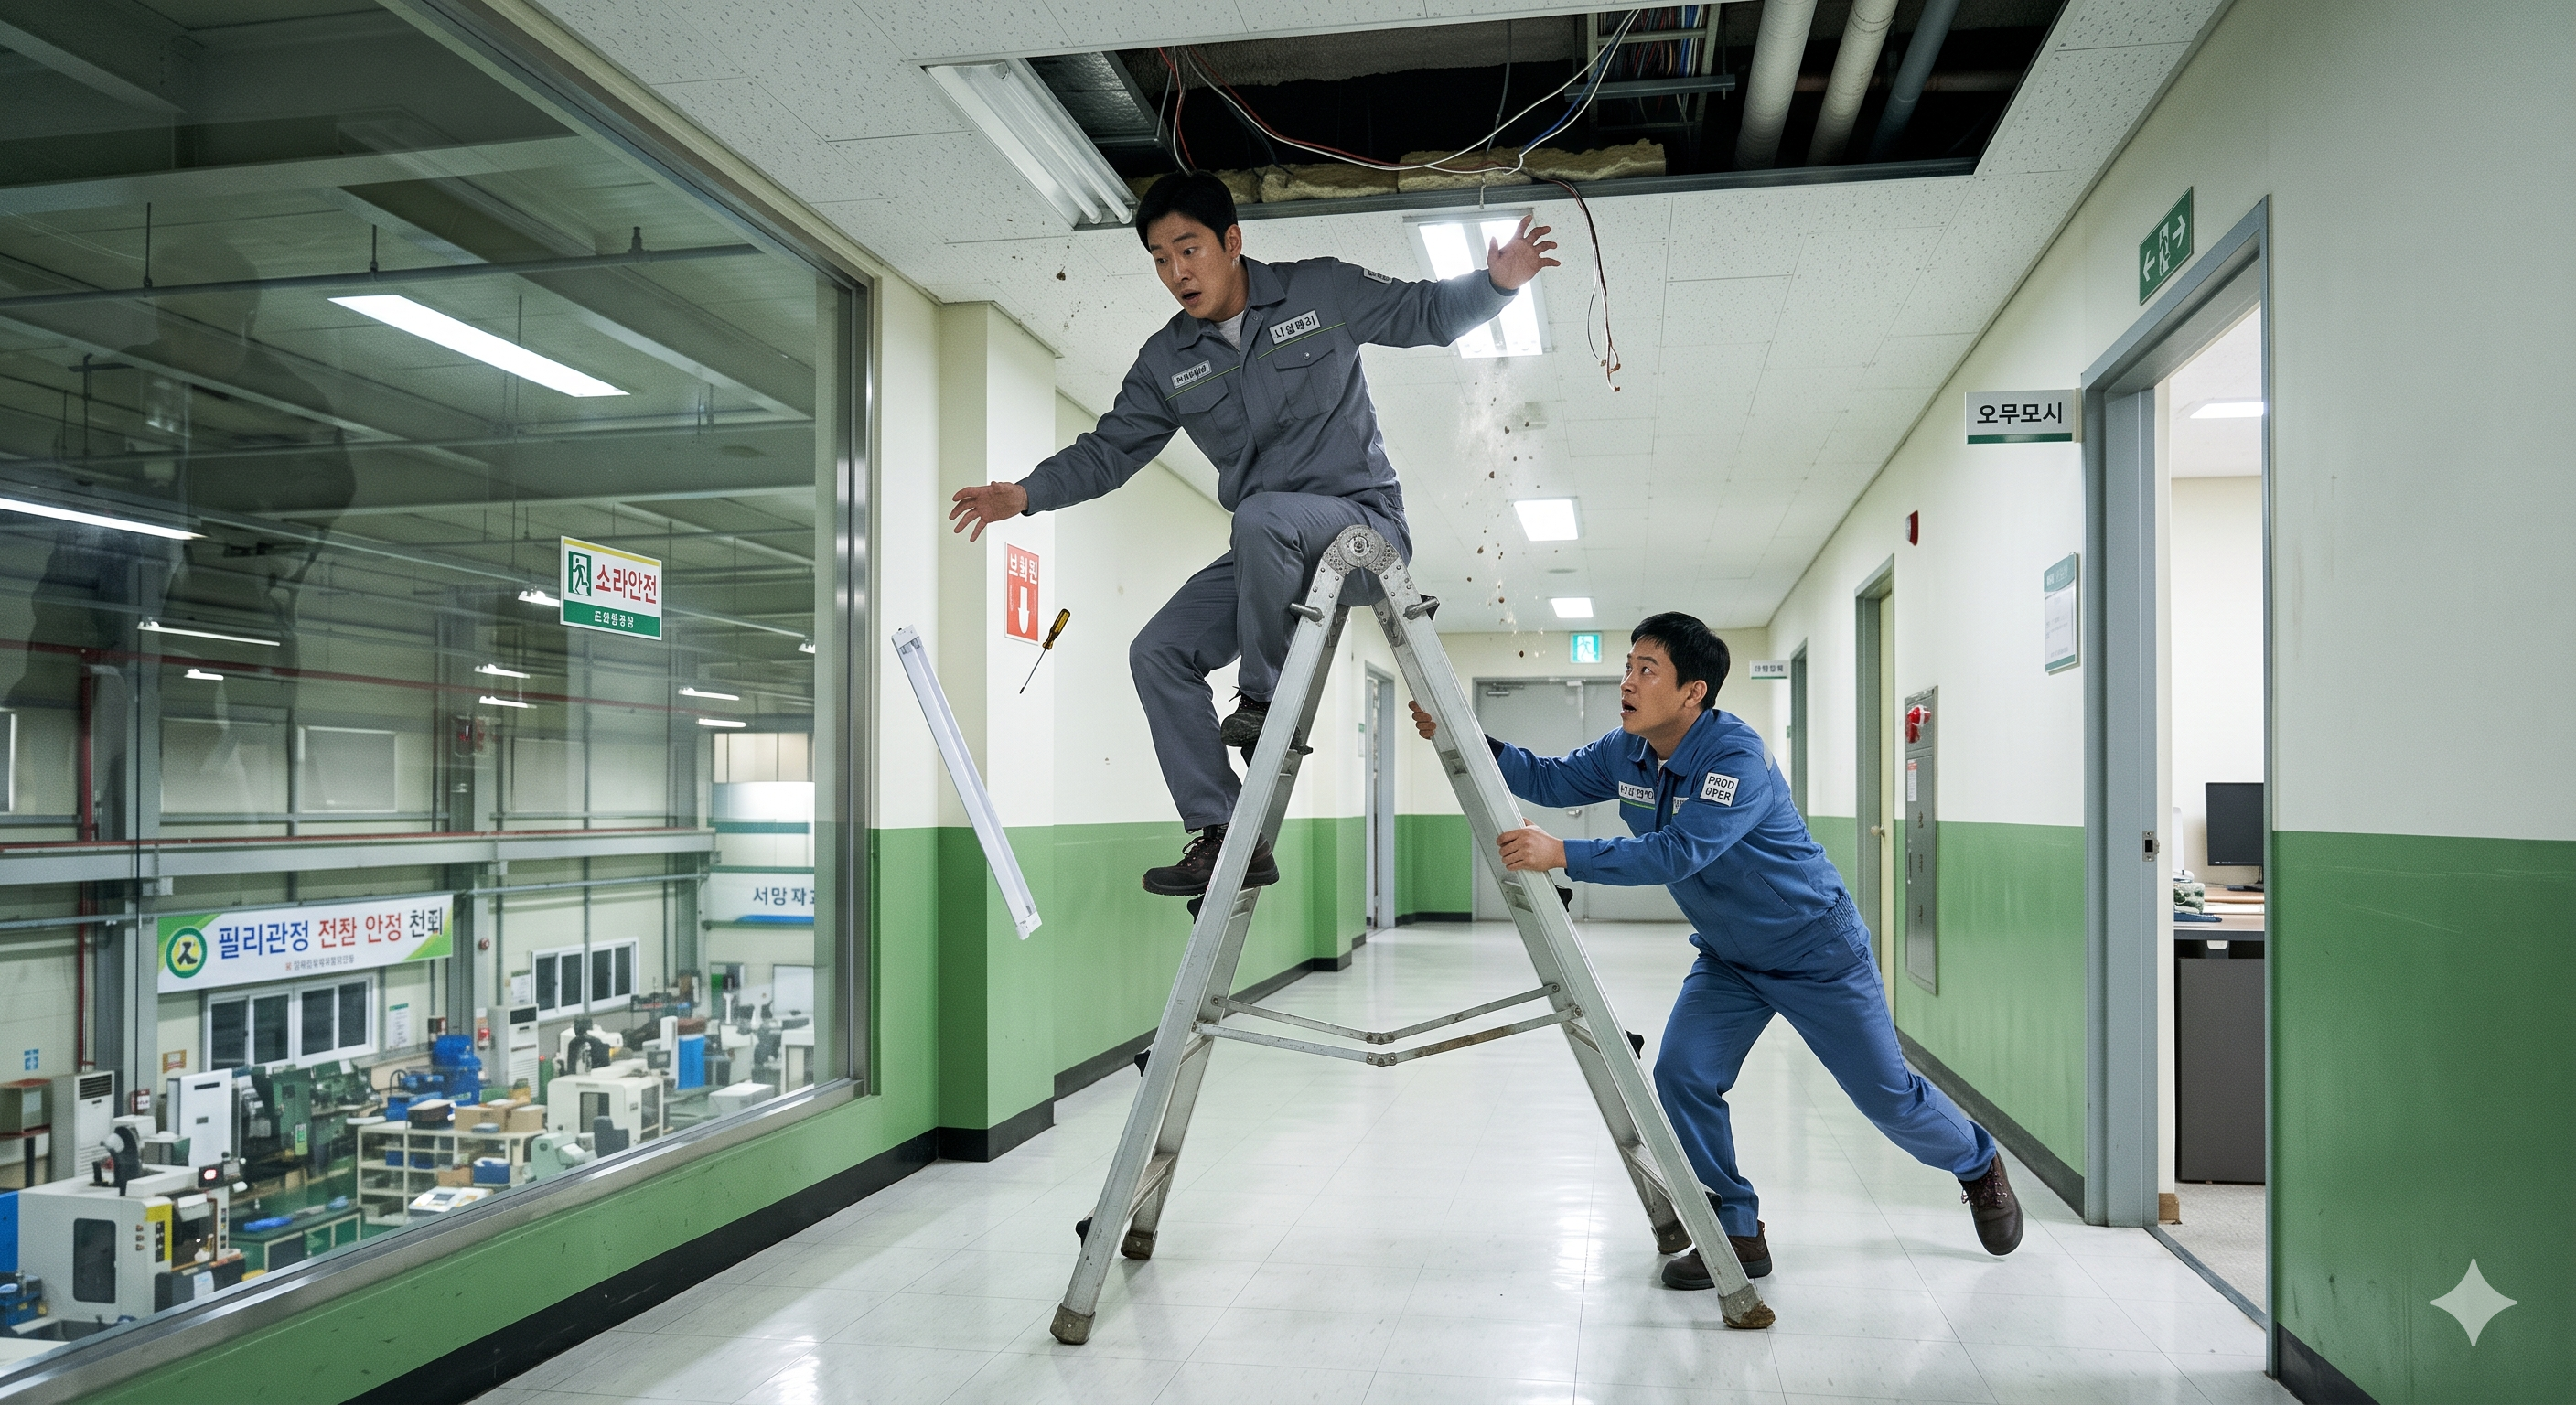
Retained educational illustration; not evidence of an actual incident.
The scenario and record comparisons are fictional teaching examples, not records of real incidents, measurements, inspections, signatures or approvals.
| Item | Fictional scenario |
|---|---|
| Initial situation | A worker plans a brief ceiling fitting replacement. |
| Changed condition | The fixing cannot be reached comfortably and a second electrical feed is unverified. |
| Failure path | Reaching from an unsuitable step while touching a live component could cause loss of balance. |
| Possible outcome | Possible outcomes include electric injury, falling and a dropped fitting; no actual accident is asserted. |
| Prevention barrier | Stop, choose suitable access and prove the correct isolation before release. |
Failure mechanisms
A sideways force and raised centre of mass can overturn a ladder; a person holding the base does not guarantee stability. Inspect support, locks, loading and reach together.
A wall switch or non-contact detector alone does not establish electrical isolation. Identify emergency batteries and other feeds, control stored energy, and have a qualified person verify absence of voltage using an appropriate instrument checked before and after use.
Decision sequence
| Decision stage | What to verify |
|---|---|
| Known facts | A worker plans a brief ceiling fitting replacement. |
| Unresolved matters | The fixing cannot be reached comfortably and a second electrical feed is unverified. |
| Reason to hold | Reaching from an unsuitable step while touching a live component could cause loss of balance. |
| Required evidence | Access choice · Task duration · Fitting weight · Standing-level label |
| Restart decision | Stop, choose suitable access and prove the correct isolation before release. Site evidence is pending; no work permission is granted by this document. |
5. Conditional decisions and common errors
| Condition | Action | Evidence | Proceed when |
|---|---|---|---|
| Fall from height | Choose safer platform · Limit light brief work · Check reach and load · Follow local ladder rules | Access choice · Task duration · Fitting weight · Standing-level label | Safe access chosen |
| Electric shock | Identify all feeds · Lock isolation points · Discharge per procedure · Prove dead with suitable tester | Isolation register · Tester before/after · All conductors tested · Qualified electrician | All feeds isolated |
| Fall while reaching | Use permitted standing level · Descend to reposition · Support fitting before release · Stop for changed scope | Standing position · Stable working posture · Fitting support · Isolation remains valid | Stable position confirmed |
Similar situations, different decisions
The scenario and record comparisons are fictional teaching examples, not records of real incidents, measurements, inspections, signatures or approvals.
| Comparison | Situation A | Situation B |
|---|---|---|
| Select access | Wrong ladder size · Work needs two hands · Forceful fixing · Platform not considered | Choose safer platform · Limit light brief work · Check reach and load · Follow local ladder rules |
| Isolate supply | Wrong circuit · Switch only off · Battery still connected · Untested conductor | Identify all feeds · Lock isolation points · Discharge per procedure · Prove dead with suitable tester |
| Replace fitting | Stand on forbidden step · Lean beyond rails · Release unsupported lamp · Scope changed | Use permitted standing level · Descend to reposition · Support fitting before release · Stop for changed scope |
6. Roles and responsibilities
| Role | Responsibility |
|---|---|
| Work supervisor | Confirm the work method, resources, competence and stage permission. |
| Technical reviewer | Resolve design, electrical, structural or equipment questions within the person’s competence. |
| Authorised operator / worker | Inspect before use, follow the agreed method and stop when conditions change. |
| Area controller | Keep people outside the danger area and maintain agreed communications. |
| Handover authority | Review open defects, restrictions and evidence before returning the area or starting the next stage. |
Supervision, records, handover
| Job stage | Technical and procedural controls | Site verification |
|---|---|---|
| Plan review | 1. Review current method2. Assign technical owner3. Close critical queries | 1. Access choice2. Reviewer and date3. Open-issue register |
| Competence | 1. Check task competence2. Assign stop authority3. Verify emergency readiness | 1. Training scope2. Briefing record3. Rescue plan |
| Prestart evidence | 1. Inspect actual asset2. Link evidence to stage3. Leave unchecked fields blank | 1. Ladder ID2. Inspector and time3. Evidence reference |
| Change control | 1. Stop and secure area2. Revise affected controls3. Obtain restart permission | 1. Change reason2. New evidence3. Restart authority |
| Shift handover | 1. Transfer isolation formally2. Assign zone controller3. Explain remaining hazards | 1. Isolation register2. Receiving person3. Restrictions and time |
| Closeout | 1. Quarantine defective items2. Confirm release conditions3. Archive factual records | 1. Defect disposition2. Release decision3. Record revision |
7. Hold points and record comparison
| Hold point | Evidence before release | Confirmation / approval |
|---|---|---|
| Start | Planning, preparation, execution, controlled shutdown and handover are covered by the eight stages below. Each stage requires site-specific inputs and competent review. | |
| HP-1 Select access | Access choice · Task duration · Fitting weight · Standing-level label | |
| HP-2 Isolate supply | Isolation register · Tester before/after · All conductors tested · Qualified electrician | |
| HP-3 Replace fitting | Standing position · Stable working posture · Fitting support · Isolation remains valid | |
| HP-4 Restore and test | Lock removal record · Function test result · Fault disposition · Release authority |
Complete after actual checks. Recheck after changes, defects or shift handover.
Record comparison examples
The scenario and record comparisons are fictional teaching examples, not records of real incidents, measurements, inspections, signatures or approvals.
The boxes are static record prompts, not interactive or saved approvals. A tick does not establish suitability or permission to restart. Record the evidence, person, time and unresolved issues; retain the change history.
| Record type | Insufficient record | Record checklist |
|---|---|---|
| Before start | Not verified or not recorded | □ Location and asset ID□ Verifier and time□ Evidence reference□ Unresolved issues |
| Critical control | Not verified or not recorded | □ Control checked□ Actual observation□ Inspector and time□ Decision authority |
| Change or stop | Not verified or not recorded | □ Change and reason□ Immediate protection□ Revised evidence□ Restart authorisation |
| Handover | Not verified or not recorded | □ Remaining hazards□ Equipment restrictions□ Receiving person and time□ Next inspection |
8. Site checklist and emergency response
| Check item | Result | Person / action |
|---|---|---|
| □ Select access: Access choice | ||
| □ Inspect and set: Ladder ID | ||
| □ Isolate supply: Isolation register | ||
| □ Climb and transfer: Climbing route | ||
| □ Replace fitting: Standing position | ||
| □ Check before power: Connection inspection | ||
| □ Restore and test: Lock removal record | ||
| □ Clear and hand over: Waste classification | ||
| □ Release / handover authority |
Stop work
Stop if a critical control is missing, the conditions change, an unplanned movement occurs, or an exclusion boundary is breached. Secure the area. The responsible competent person must resolve the cause, document the evidence and obtain site authorisation before restart.
Emergency response
Stop work and warn others from a safe position. Isolate energy only where safe. Activate the site emergency plan and local emergency services. Do not enter an unstable structure, touch an electrically exposed casualty or attempt an improvised suspended rescue. Use trained rescuers and the planned equipment.
9. Sources and review limits
2026-10-12
| Source | Scope and limitations |
|---|---|
| HSE — Safe use of ladders and stepladders | HSE guidance for Great Britain: stable footing, locking, suitable handholds and control of side loading. Confirm Northern Ireland requirements separately. |
| HSE — Work at height FAQs | Brief light two-handed stepladder work is conditional on suitable body support; it does not justify prolonged ballast replacement. |
| OSHA 29 CFR 1910.333 | Foreign US technical reference for isolation, not UK electrical legislation. |
This is reference content written and revised with AI. It has not been verified or approved by a professional. Review by a suitably qualified professional and site authorisation are required before use.
10. PDF guidance and FAQ
PDF A covers basic task controls; B focuses on technical failures; C covers supervision, records and handover. The article has eight stages with four items per main cell; each PDF has six key stages with three items per main cell. P/S/R/A, measurements, confirmations and signatures remain blank for actual site assessment.
Content group ID
jsa-stepladder-work
What must be confirmed for Select access?
Required controls: Choose safer platform; Limit light brief work; Check reach and load; Follow local ladder rules. Evidence to record: Access choice; Task duration; Fitting weight; Standing-level label.
What must be confirmed for Isolate supply?
Required controls: Identify all feeds; Lock isolation points; Discharge per procedure; Prove dead with suitable tester. Evidence to record: Isolation register; Tester before/after; All conductors tested; Qualified electrician.
What must be confirmed for Replace fitting?
Required controls: Use permitted standing level; Descend to reposition; Support fitting before release; Stop for changed scope. Evidence to record: Standing position; Stable working posture; Fitting support; Isolation remains valid.
What must be confirmed for Clear and hand over?
Required controls: Use suitable waste container; Apply lamp spill procedure; Fold by designated grips; Secure ladder and clear route. Evidence to record: Waste classification; Final area check; Equipment defect log; Handover record.
Has a professional verified or approved this document?
No. Public sources and editorial, layout and consistency checks were reviewed using AI. No site inspection or professional technical approval has been performed. Obtain appropriate professional review before use.
11. Revision history and authorship
This is reference content written and revised with AI. It has not been verified or approved by a professional. Review by a suitably qualified professional and site authorisation are required before use.
| Date | Version | Change | Review status |
|---|---|---|---|
| 2026-06-26 | Original version unmarked | Original preserved | No professional approval |
| 2026-10-12 | 2026.10.12 | Decisions, records, JSA and PDFs revised | No professional approval |
Retained the original work scope, illustration and valid inspection, isolation, exclusion and housekeeping controls. Replaced unsupported universal numbers, guaranteed outcomes and prefilled risk acceptance with evidence-based site decisions. Unverified incident narratives are now expressly hypothetical; unsupported professional validation claims are removed. Original JSON, body, PDF bindings and downloaded PDFs are preserved separately. HSE advises against working from the top three steps without a suitable handhold. Brief light two-handed work needs suitable body support and risk assessment; sustained fitting replacement may need a platform. Do not transfer a leaning-ladder angle to an A-frame or treat a helper as a substitute for stable footing.